
Lesson
Computer Vision Applications & Actuator Control
In this final lesson we go beyond running Computer Vision on a single frame — we look at how CV drives real-world actuators (motors, gates, conveyors, sorters) and how the same techniques you learned in Lessons 1–5 power a huge range of industrial and everyday products.
Case Study: Smart Counting & Classification of Electronic Components
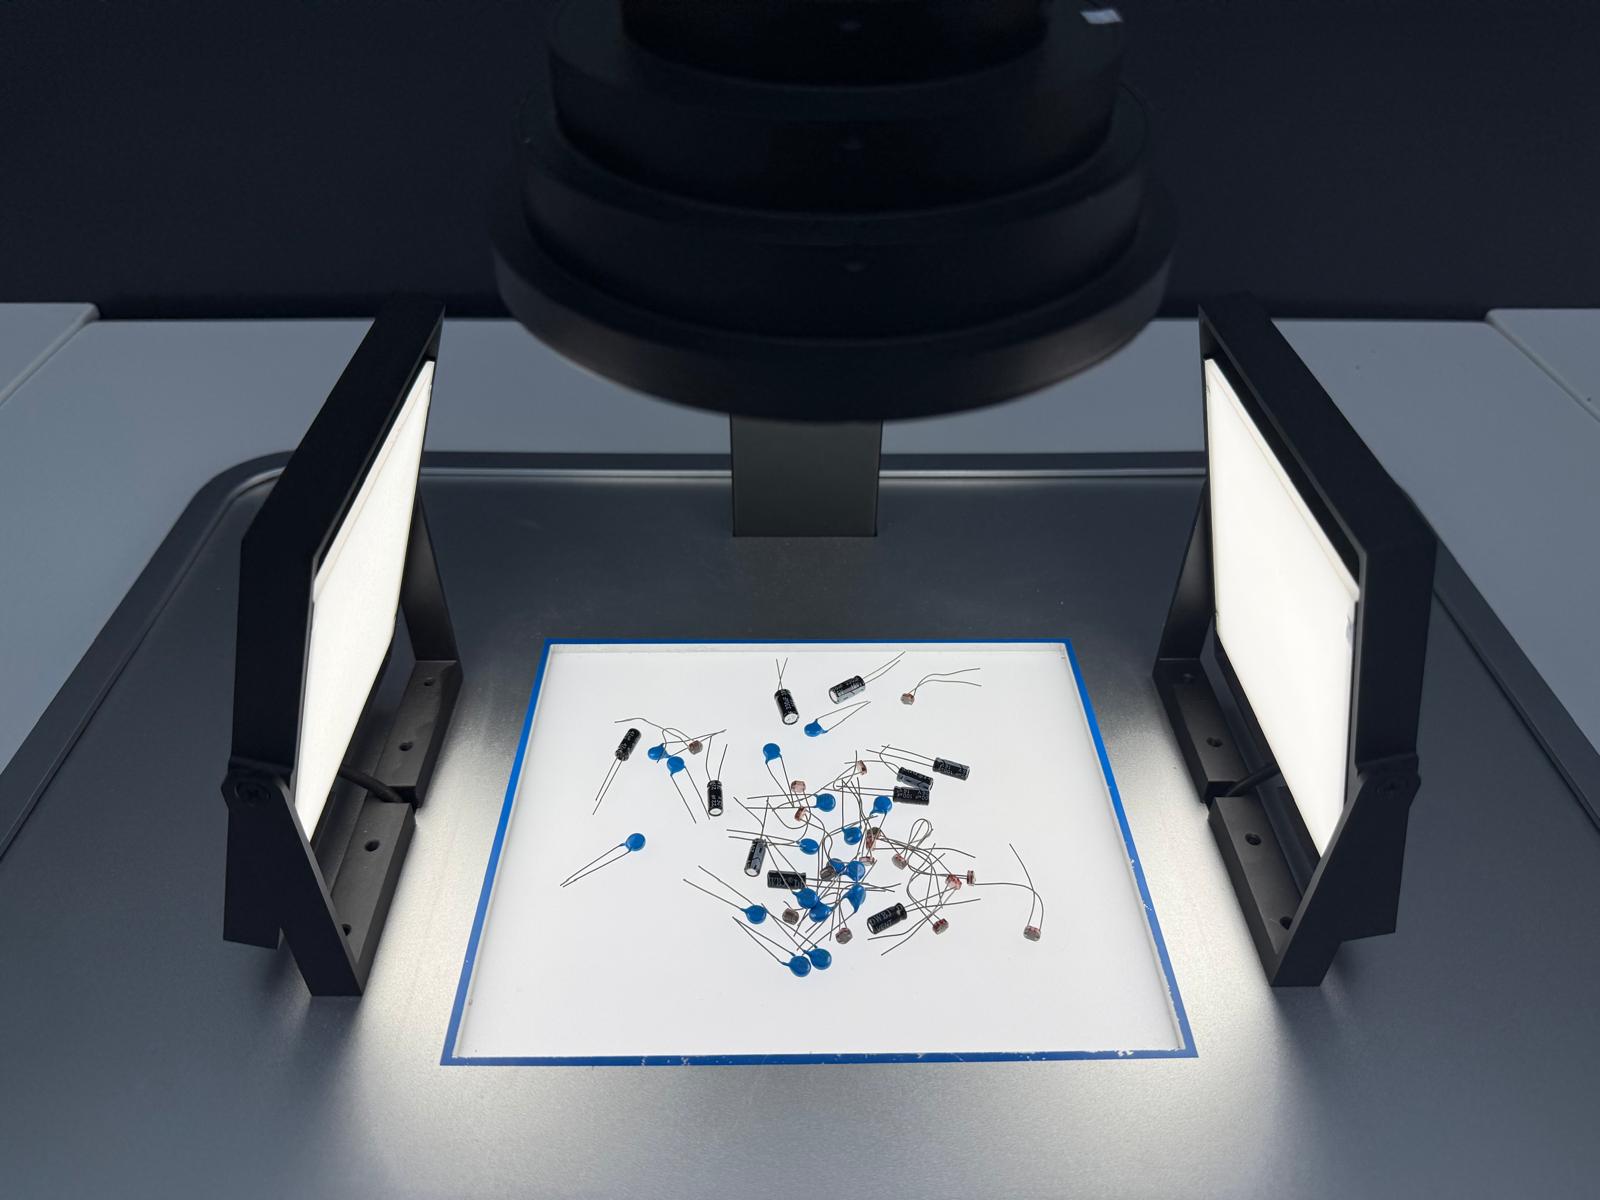
The images and videos below were captured at a factory demo built by SMore ViMo. A fixed overhead camera looks down at a bin of mixed capacitors and resistors on a backlit stage; a CV pipeline detects, classifies and counts each component in real time, then displays the running tallies on an operator HMI.
The exact same idea — camera → detection → counter/decision → actuator — is what you built on the Ultra96 for the PCB etching line.
The inspection station
The physical setup is intentionally simple: a lens + ring light aimed at a diffuse white tray. Consistent lighting is usually more important than a fancier model.
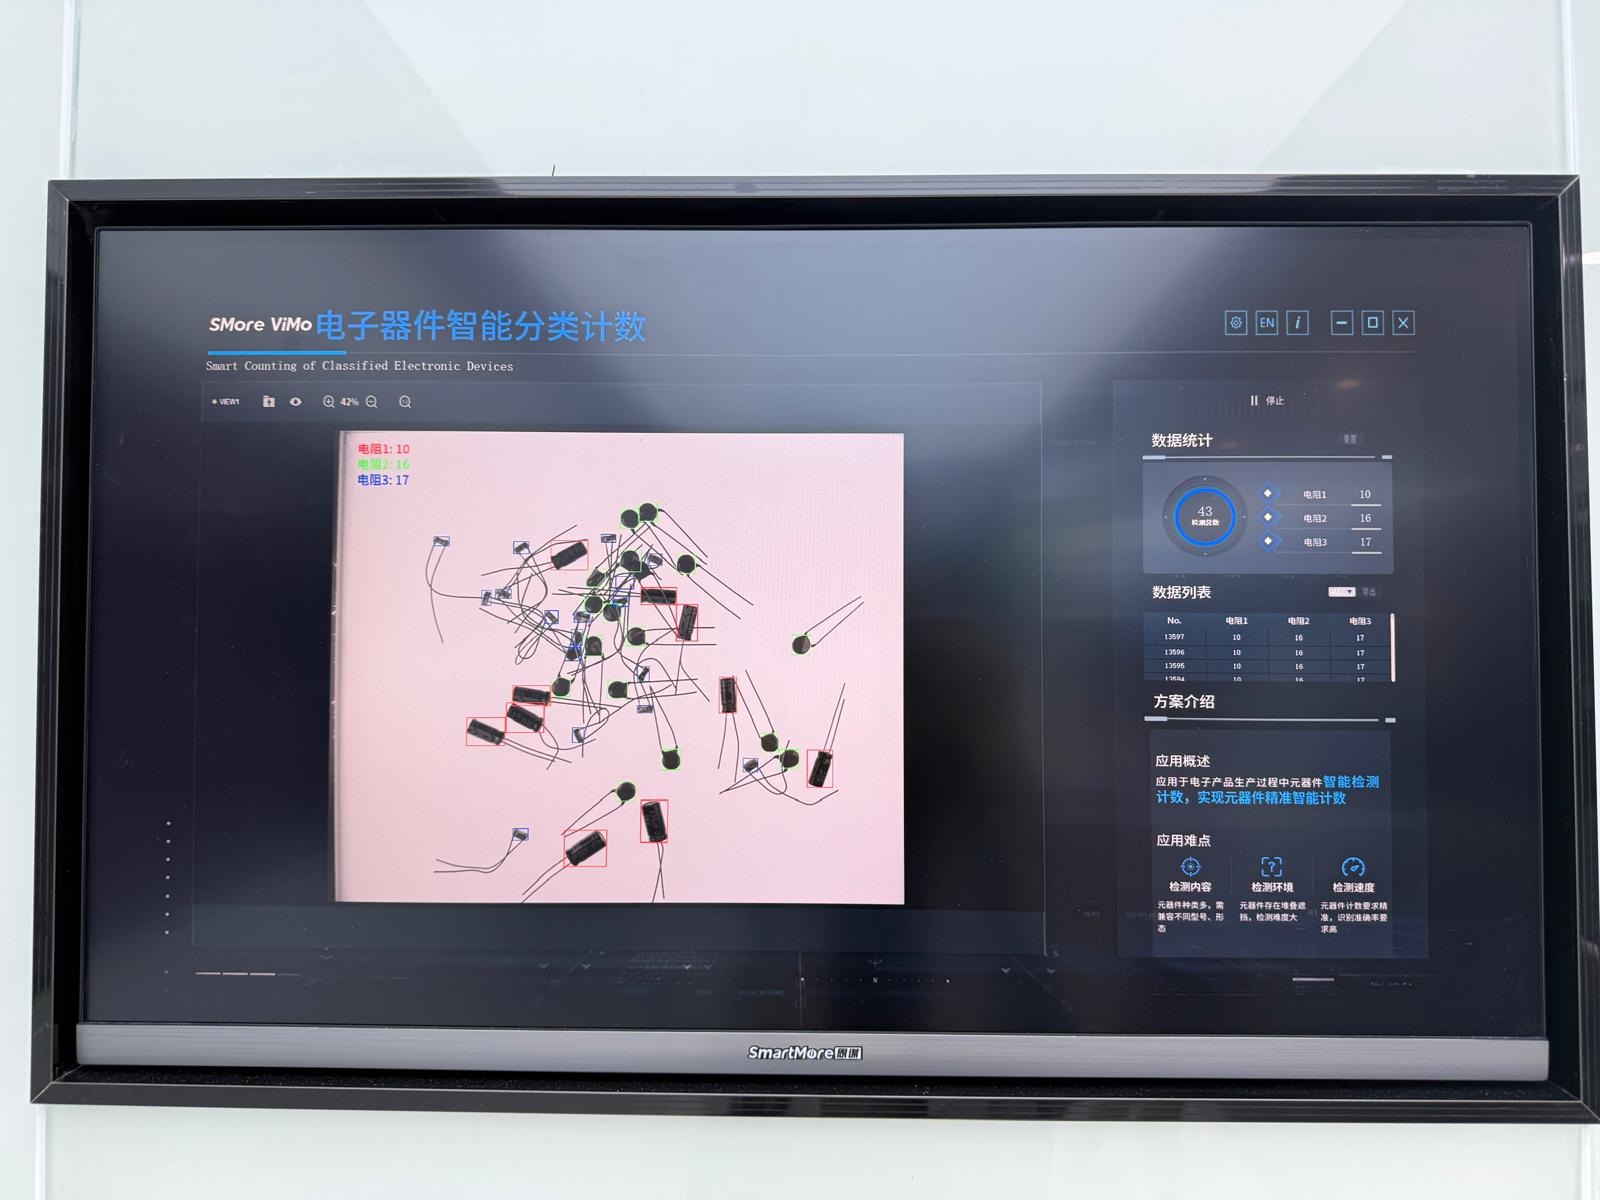
The operator HMI (built with OpenCV-style overlays)
Notice how much of the UI is exactly what you learned in Lesson 1 — CV2 UI: a custom title font, live camera feed, coloured bounding boxes per class, a counter panel, and a running log table.
Live demos
CV Is Everywhere
Once you understand the loop camera → look → decide → act, you start seeing it everywhere. Here are four everyday examples — each image shows what the camera "sees" after Computer Vision has drawn its boxes on top.
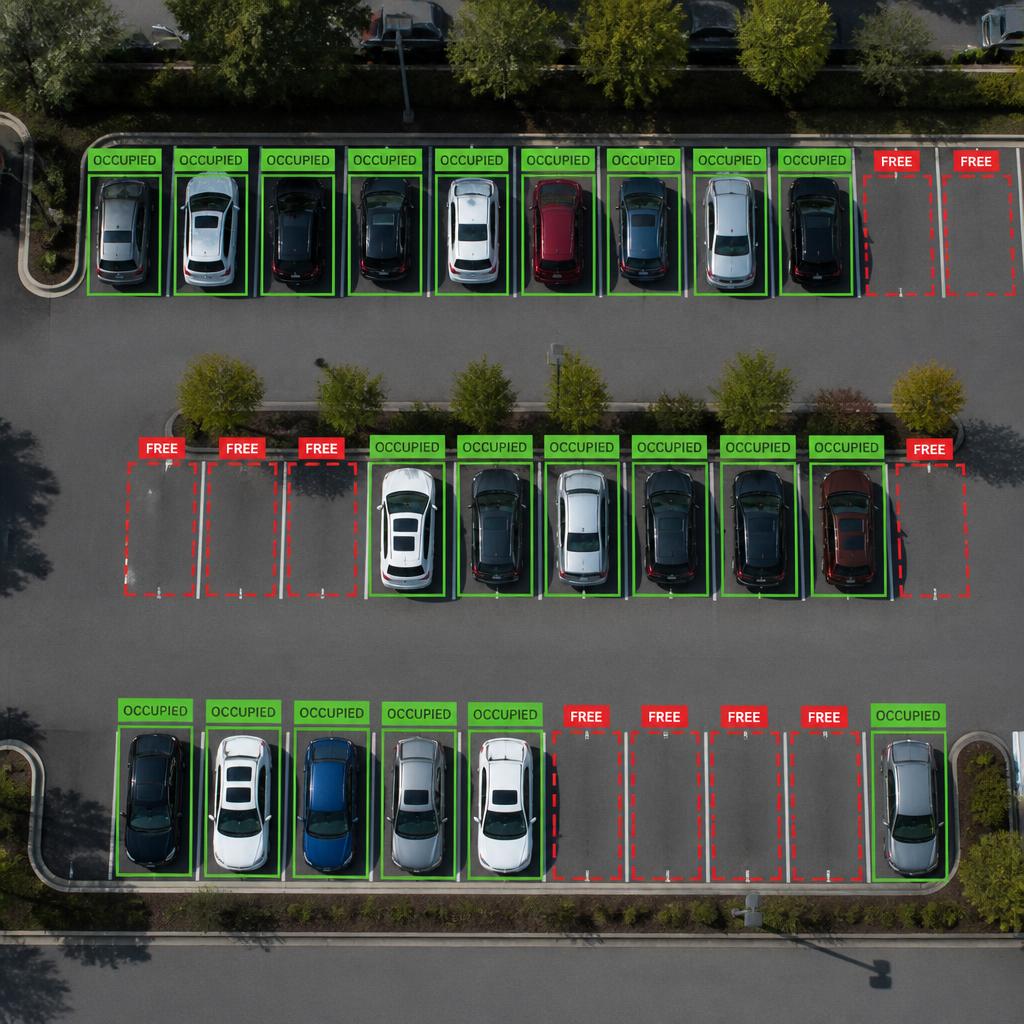
Smart parking
The camera looks down at a lot and puts a green box around every stall that has a car, and a red dashed box around every empty one. A sign at the entrance can then show "12 spaces free" and the gate opens automatically.
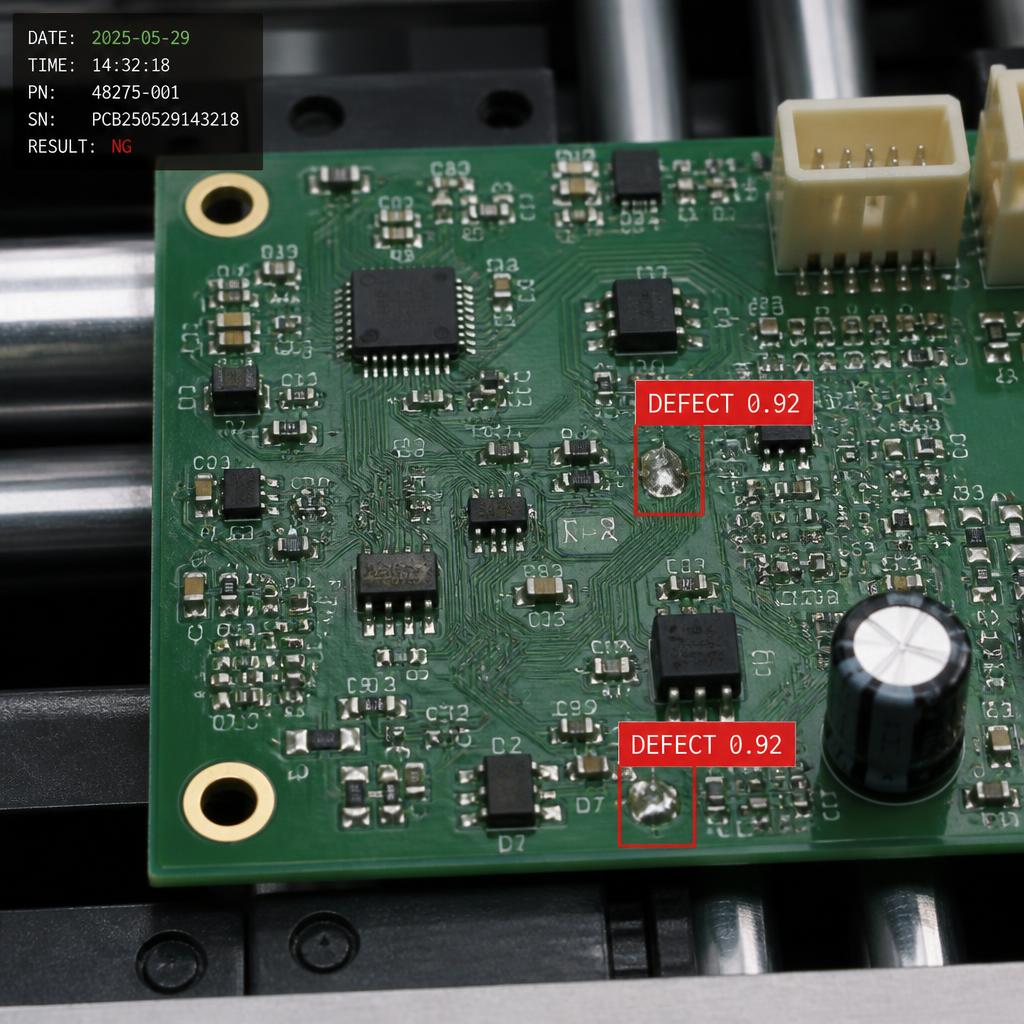
Defect detection on a production line
A camera above the conveyor inspects every board. If it finds a bad solder joint or a scratch, it draws a red box around it and the machine flips a pusher to kick that board into the reject bin — no human needed.
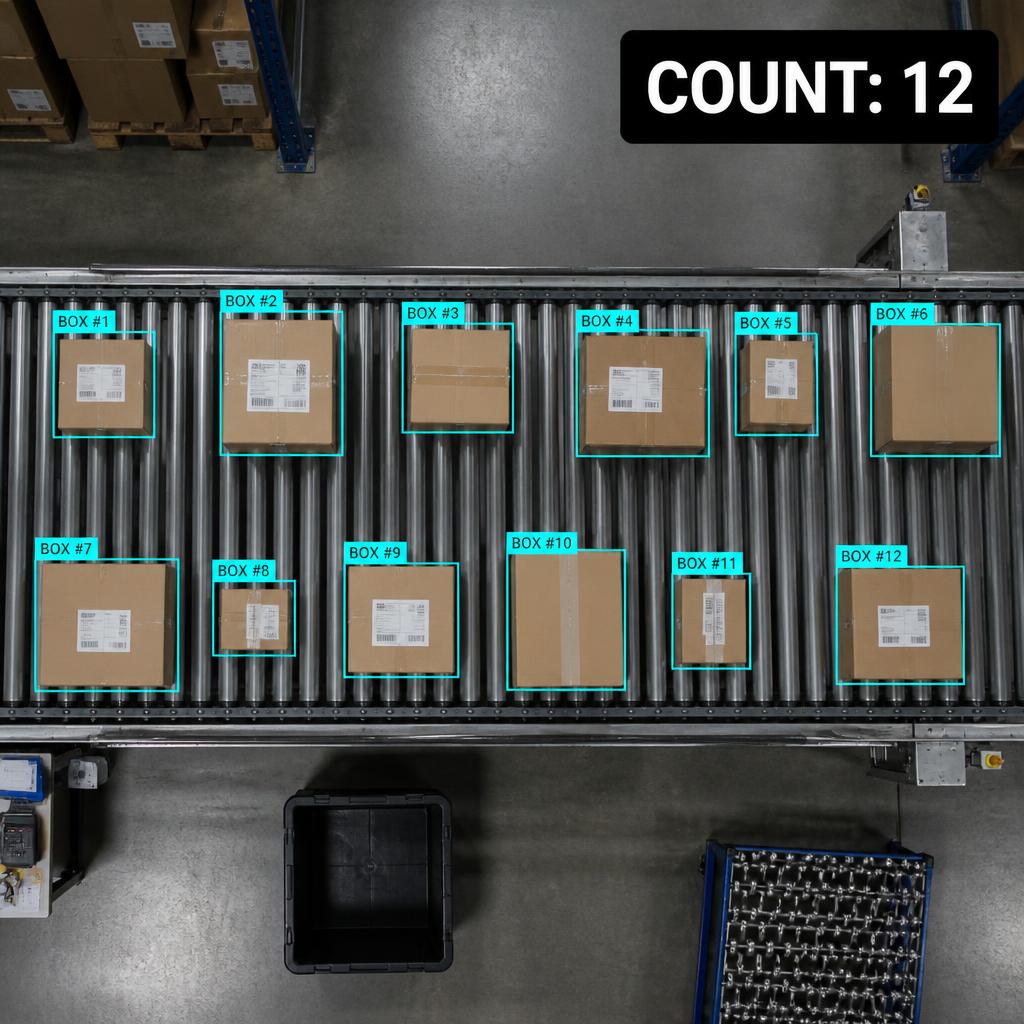
Object / parcel counting
Every parcel that moves under the camera gets a cyan box and a number. A running total in the corner tells the warehouse how many boxes went past — used for stock-taking, billing and sorting.
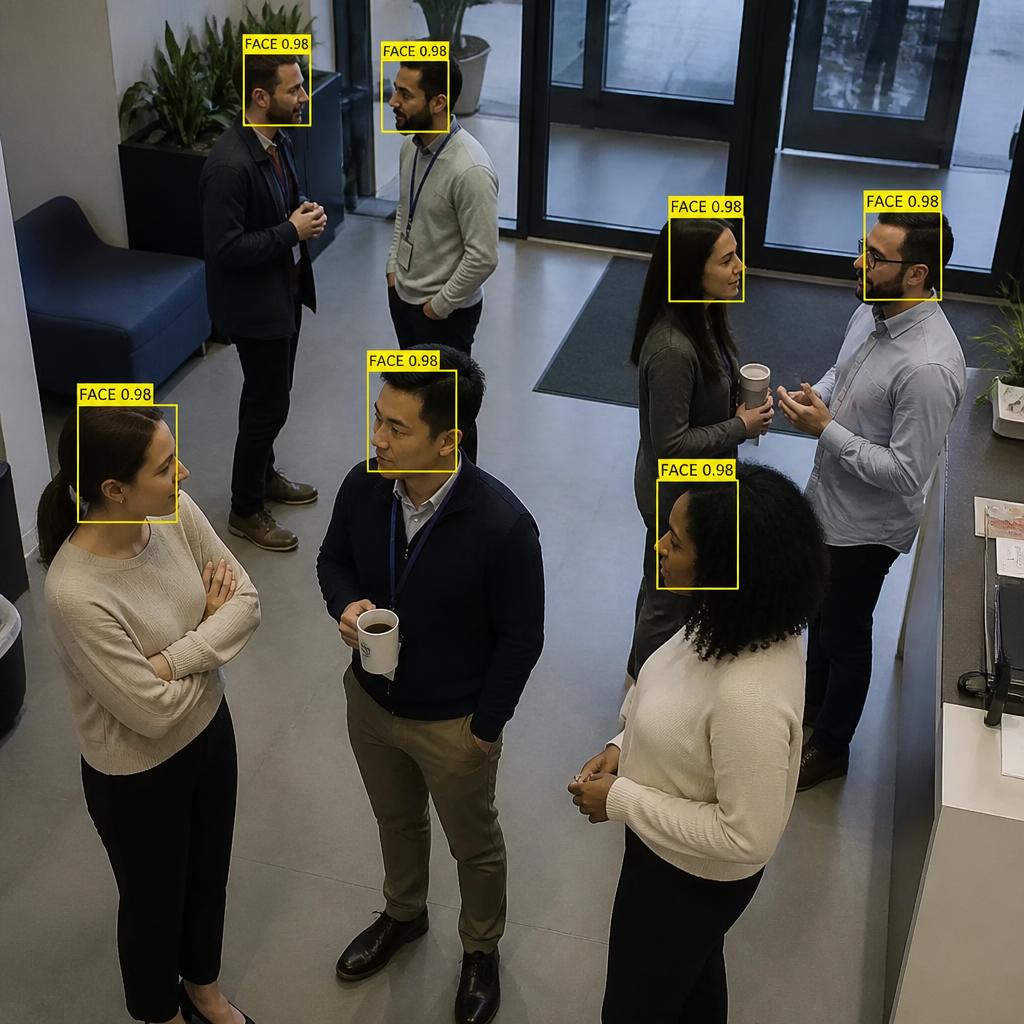
Face detection
A yellow box appears around every face the camera sees. This is the same trick used to unlock your phone, blur bystanders in Google Street View, or open an office door for staff.
And there are many more: fruit sorting, traffic-light control, cell counting under a microscope, ball tracking in football, auto-framing cameras in Zoom. They all run the same loop you already built on the Ultra96 — only the "brain" (the model) changes.
Building Your Own UI + CV App with the help of Gemini
You don't have to memorise the OpenCV library. You can describe what you want in plain English to an AI like Google Gemini, ChatGPT, or Lovable, and it will write the Python code for you.
The trick: tell the AI which building block to use. Below is a plain-language cheat-sheet — pick the rows you need and copy the "words to say" into your prompt.
Cheat-sheet: what to ask for
| I want to… | Words to say in your prompt | Bits it will use |
|---|---|---|
| Show a window on screen | "open a window called X" | cv2.namedWindow, cv2.imshow |
| Use a nice title font | "use the custom font MyFont.ttf" | PIL.ImageFont.truetype, ImageDraw.text |
| Put a background picture behind everything | "load bg.png as the background" | cv2.imread, cv2.addWeighted |
| Show live video from a camera | "use the USB webcam at 1280×720" | cv2.VideoCapture(0), cap.set(...) |
| Play a moving/animated background | "loop the GIF loop.gif as background" | imageio.mimread |
| Find something by colour | "find all red objects" | Convert to HSV, cv2.inRange |
| Clean up a messy mask | "smooth the mask, remove tiny specks" | cv2.morphologyEx, GaussianBlur |
| Find edges / outlines | "find the outline of each object" | cv2.Canny, cv2.findContours |
| Detect faces | "detect faces in the frame" | cv2.CascadeClassifier, cv2.dnn |
| Detect / classify anything | "use a YOLO model to detect X" | ultralytics YOLO, or pynq_dpu on Ultra96 |
| Draw a box around each detection | "draw a green box around every X" | cv2.rectangle |
| Write a label on the box | "label each box with its name and score" | cv2.putText |
| Show a live counter | "show Count: N in the top-right corner" | cv2.putText + a Python counter variable |
| Count things crossing a line | "count objects as they cross a red line" | Compare box centroid vs a line's y-value |
| Show frames-per-second | "show FPS in the corner" | time.time() differences, cv2.putText |
| Move a motor / open a gate | "trigger the Arduino / servo when X" | pyserial, RPi.GPIO, pynq.GPIO on Ultra96 |
| Send data to a factory PLC | "send the count over MQTT / Modbus" | paho-mqtt, pymodbus |
| Quit cleanly | "quit when I press Q" | cv2.waitKey, cap.release, cv2.destroyAllWindows |
Example prompt you can paste into Gemini
Please write a Python program using OpenCV that does the following:
- Opens my USB webcam at 1280×720.
- Uses
assets/bg.pngas a background and blends the camera video on top of it.- Writes the title "PCB Inspector" in the top-left corner using the font
assets/Orbitron.ttfat size 42.- Finds every red object in the frame and draws a green box around it with a label.
- Shows a live counter "Count: N" in the top-right corner.
- When the count is more than 5, sends the message
REJECTto my Arduino on/dev/ttyUSB0at 115200 baud.- Quits when I press Q.
Paste that in and you'll get roughly 90% of a working program back. The last 10% is picking the right red colour range and mounting the camera in the right place.
Where to go next
- Re-read Lesson 1 — CV2 UI for font/GIF/overlay basics.
- Re-read Lesson 4 — Image Processing for the filter recipes.
- Re-read Lesson 5 — Computer Vision to see how the DPU accelerates inference.
- Try porting the counting demo above to the Ultra96 with a DisplayPort HDMI monitor as the operator HMI, and a GPIO-controlled servo as the actuator.
Ship something. That is the whole course.
Course Project
Now it is your turn. The final course project asks you to invent, design and build a small Computer Vision application that solves a real problem you actually care about. Get it working on your PC first (webcam + OpenCV window). Once the UI and CV pipeline behave, we then port the exact same Python code onto the Ultra96 with a DisplayPort monitor and a GPIO-controlled actuator.
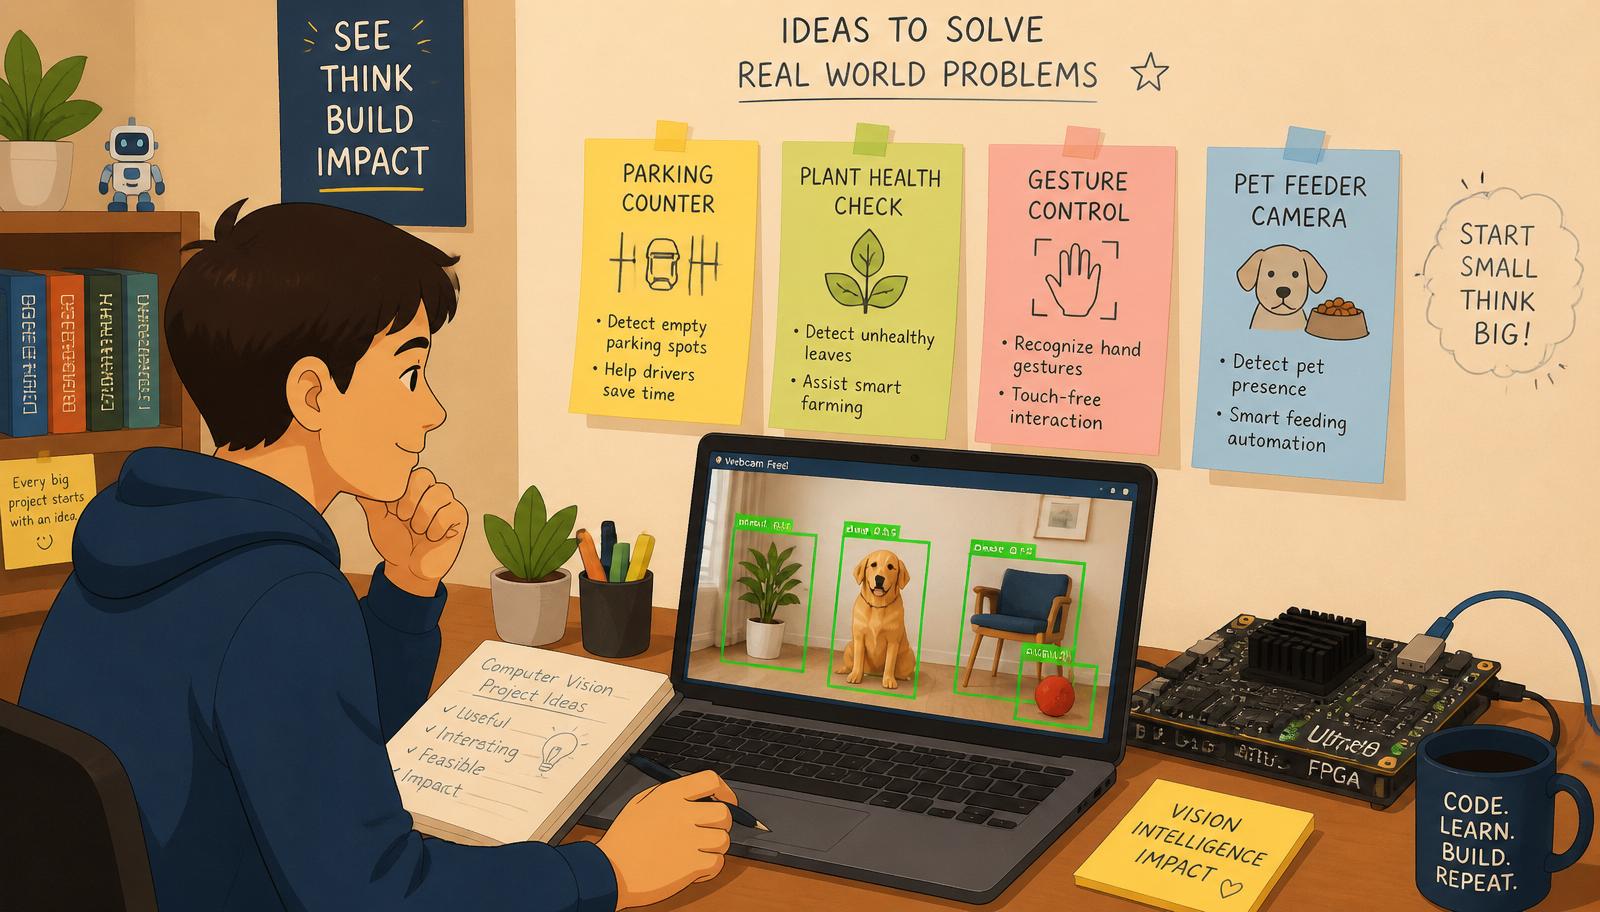
Think like a designer, not just a coder
A common mistake is to jump straight into cv2.VideoCapture(0) and start hacking. Good projects start with who has the problem and why it matters. This is what Design Thinking is about — a 5-step loop used by IDEO, Stanford d.school and most modern product teams.
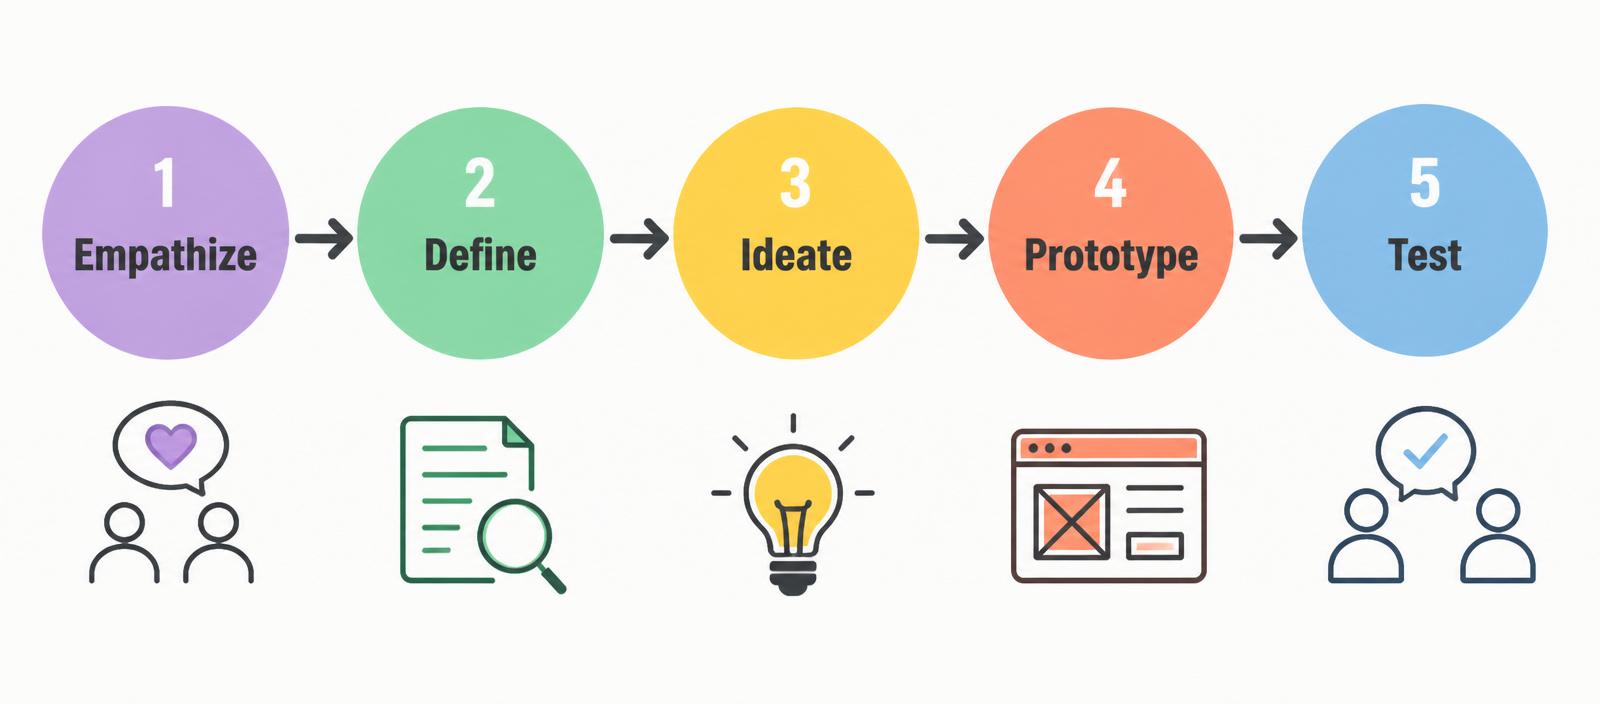
| Step | Question to ask yourself | Example for a CV project |
|---|---|---|
| 1. Empathize | Who is this for? What do they struggle with? | "My mum forgets to water her plants." |
| 2. Define | Write the problem in one sentence. | "Detect when a potted plant's leaves are drooping." |
| 3. Ideate | Brainstorm 5–10 rough solutions — no filtering yet. | Color check, edge count, YOLO plant model, humidity sensor + camera… |
| 4. Prototype | Build the smallest version that runs on your PC. | Webcam + cv2.inRange on green + a "WATER ME" text overlay. |
| 5. Test | Show it to a real user. Watch. Ask. Iterate. | Point the camera at 3 different plants. Does it still work? |
Project checklist
Your project should include, at minimum:
- A clear user & problem — one sentence: "For ___ who needs ___, my app does ___."
- A CV pipeline — camera in → some detection/filter/model → decision out.
- A custom UI — window title, background, font, live counter or status text (see Lesson 1).
- An action — either an on-screen alert, a sound, a logged CSV row, or an actuator signal (LED, servo, relay).
- A short demo video (30–60 s) showing it working on your PC.
- A stretch goal: port it to the Ultra96 (DisplayPort HDMI out + GPIO/PMOD actuator).
Suggested project ideas (pick one or invent your own)
- 🅿️ Smart parking counter for your driveway or bike rack.
- 🌱 Plant health check — flag drooping or yellowing leaves.
- 📦 Parcel/box counter at the office mailroom.
- 🐕 Pet feeder camera — dispense food only when the pet is in frame.
- ✋ Gesture-controlled slideshow — swipe left/right with your hand.
- 🚦 Home traffic light — detect if your desk is "busy" (person + monitor on) and show a red/green LED outside the door.
- 🥤 Fridge inventory — count cans/bottles left inside.
Workflow we recommend
- Write the one-sentence problem in a text file. Do not touch code yet.
- Sketch the UI on paper — where does the video go, where is the counter, what colour is the box?
- Prototype on your PC with OpenCV + Gemini (use the cheat-sheet above).
- Test with a friend. Note every moment they look confused.
- Port to Ultra96 — swap
cv2.VideoCapturefor the HDMI-in or USB camera, swapcv2.imshowforDisplayPort, wire the actuator to a PYNQ GPIO pin. - Record a demo and submit.
The Exam
Alongside the project, there is a short multiple-choice exam that checks you understood the key concepts from Lessons 1–6 (FPGA basics, PYNQ overlays, image processing, CV pipelines, actuator control).

The rules at a glance
| Rule | Detail |
|---|---|
| 📋 Format | Multiple choice (MC). Pick A / B / C / D for each question. |
| ⏱️ Time limit | Around 20 minutes per attempt. A live countdown is shown at the top of the page. |
| 🔁 Attempts | Unlimited. Retake as many times as you want. |
| 🎯 Pass mark | You must score above 80% to pass. |
| ⚡ Result | Your score appears immediately after you submit — no waiting. |
| 🏆 What counts | Only the highest score across all your attempts is recorded. Earlier lower scores are ignored. |
How a typical attempt flows
- Start the exam — the 20-minute timer begins.
- Answer each question. You can go back and change answers before submitting.
- Submit — your score is shown instantly (e.g. "17 / 20 = 85% ✅ Pass").
- Review which questions you got wrong (concept-level feedback, not the correct answer).
- If below 80%, retake — the questions may reshuffle. If above 80%, you're done, but you can still retry to push the score higher.
- Your best result is what stays on your record.
Study tips
- Skim the On this page table of contents of each lesson — most MC questions come straight from those headings.
- Pay attention to the tables and cheat-sheets in Lessons 1, 4 and 6 — they compress the exam-relevant facts.
- Do not panic if you fail the first attempt. Unlimited retakes exist so you can learn from the exam itself.